Thursday, June 20, 2013

Product Review: AHNU Montara Women's Hiking Boots Initial Thoughts

After years of hiking in the Asolo Women's Stynger hiking boot, I finally made the jump to a new boot- AHNU Montara boot. The Montara has been pretty well received and reviewed and after last year's incredible blisters upon blisters upon blisters, I knew I needed to make a change if I wanted to do longer hikes.

Now last year I just powered through the blisters. They were a regular thing. Weirdly after several hundred miles of hiking they became blood blisters (ew!). I received plenty of advice. I tried the foot guru's at EMS. I tried several foot gurus and I bought the Stynger in a smaller size (suggestion of the sales associate- didn't work and hurt more- ouch!). I had shoe sales people suggesting that I just try to form calluses, which I discovered from 20 weeks of hiking last year with giant blisters and then blood blisters and then blisters on my blood blisters, that forming calluses may take years for me.

SO finally I tried a boot that worked for me. One thing I've discovered is that if you get blisters, you can try a few strategies (tying boots differently, trying different socks or layers of sock), but likely you are in the wrong boot for you. This is tricky because some people can hike in the certain boots with no problem, in fact Adam hiked for years in the men's version of my boots without a single blister. Interestingly, when he got new boots (Vasque's) he started getting blisters.

Women's AHNU Montara Boot

Women's AHNU Montara Boot

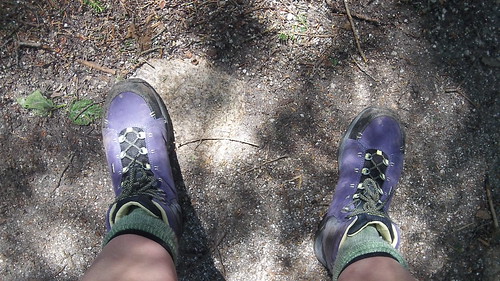
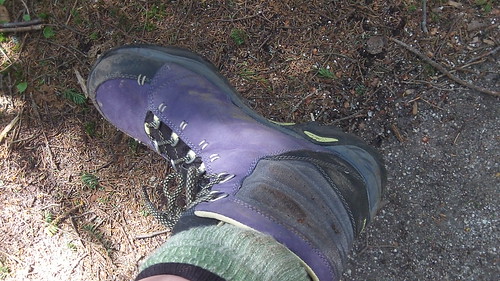
I would like to scream the following if I may... the women's Ahnu Montara boots freakin' rock!!! They are the perfect boot for me. While I definitely cannot guarantee they will be the right type of boot for other people, they are well worth a shot for those searching for the right boots. I don't get blisters in the Ahnu's!!!! I can't believe how easy it is to hike when you don't feel the scrape of skin against boot.

Ahnu Montara Hiking Boots: Initial Thoughts

Pros so far many...

  • I don't get blisters in them. This appears to be because they are somewhat of a "softer" boot, meaning they fell less stiff than my Asolos. This is tricky for me because I love a stiff supportive boot with my super flat feet, but sometimes you just gotta compromise.
  • Very lightweight. The Montara's were super lightweight every time I handled them and continued to feel light as I hiked. I literally felt like I could run in them- even ten miles in.
  • Great price point.  EMS has them listed at 149.99 and if you wait for a sale, you can score even harder.
  • I generally have pretty hot and thus wet feet after a day of hiking. So much so, that I love changing my socks midhike. After pulling these puppies off at the end of a hike my feet were actually dry- shocking. The Montara's utilize EVENT technology for waterproofing which is supposedly more breathable yet just as waterproof. I can definitely attest to the breathability...


Downside so far...

  • I feel like their soles may not be quite as sticky on rocks as my previous boots. Still better than most shoes, just not quite so sticky.
  • Less stiff and feel less supportive than other boots to me. Like I said, I have very flat feet so I am interested to see how I will do on longer than ten mile hikes.


Things I still need to find out about...

  • I haven't had the boots in really wet weather yet, so I'm not exactly sure how waterproof they are. The EVENT technology is touted to be more breathable and still waterproof, but quite frankly I hate wet feet so if my little toes become wet I may be back to ground zero.
  • Because they are lighter and less stiff, I wonder how long they will last in comparison to the Styngers. My Styngers lasted forever. Like I said before- trade offs and compromises. I'll gladly take no blisters and replace the boots more frequently instead.
  • I'm a little worried about the sturdiness of the top eyelets. I need my boots pretty snug to keep the blisters at bay and these eyelets seem a little flimsy. We'll see....


Disclaimer: Product Reviews are based on opinion only and are not intended to condone, encourage, or promote a product. Some products are sent to me by the manufacturer or affiliates and are mine to keep. I mention this specifically on products sent to me. Compensation and/or product and/or services never interfere with the review of the product. Otherwise, products and services are purchased by me for personal use. The boots were purchased by me.

Thursday, June 13, 2013

Mount Liberty and Flume 6.1.2013

Via Flume Slide Trail

Our hiking season started off with a snowy bang on Memorial Day for Mount Moosilauke, where we were greeted with fresh snowfall, snowdrifts of six inches, and massive mud puddles. Truthfully-- that's the kind of crap I like-- the sort of unexpected weather (while being prepared that is!).

Liberty and Flume 2013

The following weekend we decided to trek up two other familiar favorites-- Liberty and Flume. Last year Mount Liberty and Flume were numbers 10 and 11 on our 4,000 Footer list. At that time, we had elected to do an out and back hike, mainly because it was shorter (by around .5 miles- so minuscule) but also because I'm scared to death of heights these days.

Liberty and Flume 2013

Liberty and Flume 2013

So this time, in order to try challenge ourselves we elected to hike the Flume Slide Trail, which would give us a nice loop over the two peaks. Summer weekends can have these two popular mountains packed with vacationers and day hikers, so getting back up to see the amazing views before the crowds was an excellent idea.

Liberty and Flume 2013

Flume Slide Trail is a stellar, killer hike. I've read all sorts of different trail reports-- for some people it's not that steep or challenging and for others it's a haul. For us, we found it to be rugged and a challenge, but not what I like to call "a suffer fest." Many sections of the trail were extremely wet despite the relatively dry weather prior to our hike. I would only expect with the recent tsunami-like rain we've been getting in New Hampshire that the trail conditions continue to be wet and slick.

Liberty and Flume 2013

Looking at Mount Flume

Liberty and Flume 2013

The Top of Mount Flume

Liberty and Flume 2013

Mount Liberty from Mount Flume

The trail winds through a nice forested area, crisscrossing over a small stream several times. Our hike was accompanied by humid and hot weather, so it was nice to dip our faces and heads into the cool water. The trail later turns into a rocky scramble up sheer rock. It's manageable with footholds and handholds, but really tricky when wet.

Liberty and Flume 2013

Liberty Under a Cloud Shadow From Mount Flume (this is one of those peaks that looks ridiculously far away after you just killed yourself up one mountain)

We stopped near the top to down our sandwiches and bumped into a friendly hiker with his two dogs. I think the dogs handled the scrambles better than me! It's always great to see how even the smallest amongst us can handle tough terrain. This hiker and his dogs are roughly at around the same number for 4,000 footers after just starting last year and since we both saved many of the longer hikes for last-- we may be seeing more of each other!

Liberty and Flume 2013

Hikers on Top of Flume

Liberty and Flume 2013

Mount Flume with Waterville in the Distance

Liberty and Flume 2013

The views atop Liberty and Flume are absolutely amazing. I never get over the way the clouds cast shadows on top of the mountains and while I love the feeling of isolation in the middle of the wilderness, I'll take this busy, but scenic view any day...

Liberty and Flume 2013

Liberty and Flume 2013

Wednesday, May 29, 2013

Hiking the 4,000 Footers: Mount Moosilauke 5.27.2013

Gorge Brook Trail

To kick off our 2013 hiking, we decided to trek back up a familiar peak- Mount Moosilauke- in order to get ourselves back into shape for hiking our 4,000 Footer list.

Mount Moosilauke 2013

Mount Moosilauke 2013

(We had big plans to work on our Winter List this year, but let's face it- life gets in the way sometimes! For our plain 'ol 4,000 Footer list we have a lot of the big peaks and treks left- the Bonds, Isolation, etc., so we may be hiking peaks we've already hiked in order to prep.)

Mount Moosilauke 2013

Mount Moosilauke 2013

Memorial Day weekend gave us four days in a row to hike and we were so pumped! Until we saw the weather reports that is... Turns out Memorial Day weekend was basically a wash up here in New Hampshire. We had serious rain paired with winds and unseasonable cold temps. So we had only one day to really get a hike in and that was on Memorial Day itself.

Mount Moosilauke 2013

The conditions were manageable, but extremely poor. You basically saw all your typical spring thaw conditions-- mud, mud and more mud. And did I mention snow? That too.

Mount Moosilauke 2013

Mount Moosilauke 2013

The lower end of the trail was extremely wet and muddy, making the trail slippery and slow going. As we climbed higher the trail became snowy and muddy and the trees began to melt away the snow stuck to their branches so it was almost raining on us.

Mount Moosilauke 2013

Mount Moosilauke 2013

Above treeline the snow was much deeper- maybe drifts of close to a foot. It would have been helpful with traction, but it wasn't necessary. Wind speeds were amazing on our hike! At the top sustained speeds had us hunched over and gusts knocked us around.

Mount Moosilauke 2013

(I know- we are totally a Marmot commercial!)

Mount Moosilauke 2013

Mount Moosilauke 2013

The good news is as we hiked down the snow appeared to be melting quickly! So there may not be as much snow on Moosilauke for those who head out next weekend.

Mount Moosilauke 2013

Mount Moosilauke 2013

Mount Moosilauke 2013

Mount Moosilauke 2013

Mount Moosilauke 2013

Tuesday, February 26, 2013

Natural Collections

I recently started my own collection of striped rocks. And I've been inspired by so many other forms of natural collections...


Rock Collection

My own collection of rocks.


Camper of the Week


Monday, February 25, 2013

Cabin of the Week


Tiny Greenhouses

I have long been a fan of the tiny trend- tiny houses, tiny cabins, tiny cars. Since we aren't in the market to build our own tiny cabin quite yet, I've decided to spend this cold wintery day dreaming up plans for a tiny greenhouse.


The key to a tiny greenhouse is salvaged materials. Many creative builders across the web have demonstrated what a few discarded windows can give you. Whenever I see windows at yard sales I scoop them up because even if you aren't going to build a tiny greenhouse, you could certainly use the windows for a simple removable cold frame.


Source (links to Finnish Company)

Thoughtful placement is also a very important aspect to the tiny greenhouse. Maximize your passive heating and energy by locating the windows to the south, where the most direct sunlight will help warm up the greenhouse.