I’m a big fan of outdoor media- I love the adventure magazines and soak up outdoor blogs. Many of the larger outdoor adventure magazines are so focused on the men that they’re cover articles are often geared exclusively for them.
I’m figuring that demographically the male population highly outnumbers the females in most outdoor adventures sports and maybe that is why large publications like Outside magazine tend to leave out the girl factor. Well, fear not all I’ve developed a master list here of all the excellent women mountain biking magazines, outdoor adventure blogs and more media. It’s almost too good to be true.
Women’s Outdoor Magazine Publications
Women’s Adventure Magazine
Not only does this magazine encompass everything I love about the outdoors, but they also have some issues available online.
Bike
I’m putting Bike Magazine on the best women outdoor magazines because its most recent publication (Sept/Oct) has the article Mountain Biking’s Raddest Women. Not only does it feature some of the finest women mountain bikers, but it also has multiple other women specific articles. Way to go Bike!
Women’s Cycling Magazine
I still haven’t picked this one up yet, but the idea that we have a whole magazine to ourselves is outrageously cool.
She Pedals Magazine
Another one that we must support ladies! I can’t even believe we may be close to two women’s specific cycling publications. They’re due out September 1st and are still working on their website.
Sports Sister Magazine
A British publication about sports, has tons of inspiring articles and many features about the outdoors and even mountain biking.
Outside Magazine
Okay, I actually think that Outside magazine gets pretty low ratings for female adventurers, but in recent months they’ve been trying to make it up to us. I really like this landing page for Women in Sports.
Women’s Running
I'm not that much of a runner, but since Her Sports magazine became Women's Running I've been getting this subscription in the mail. It's actually quite good and has some great fitness and training articles.
Something I missed? Let me know! I plan to continually update this list. Check back in this week when I will list best women’s outdoor blogs. It’s a list you don’t want to miss!

Monday, August 31, 2009
Thursday, August 27, 2009
Still Chasing Summer
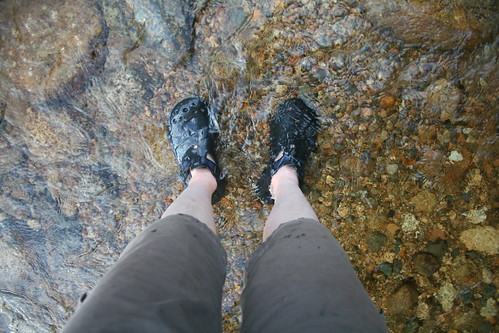
I don't know about you all, but I am still determined to chase down summer- for as long as possible. So what that it is almost September right?

Fall means beautiful, cool weather for New England and it looks like we'll be getting a taste of it this weekend. I enjoy fall. Really I do. But it also makes me nervous.
You see, last winter I fell into the responsibilities trap. You know the trap. Things like work, school, cleaning the apartment, holidays. Commitments and responsibilities almost sucked the life out of me last winter. I gained lots of weight. I ate lots of white, bland, comforting food.
This year I've decided I am going to keep living summer all winter. I'll be somewhat responsible- sure. I mean I really have to be at this point. There are things like a dog, a boyfriend, and an almost complete graduate degree that require me to be. But at the same time I am going to be careful to make more decisions that are important for being happy.
Maybe it will mean a B in a class (believe it or not, if you get below a B- at my grad school you have to retake the class). Maybe it will mean a messy apartment and not being completely prepared for everything all the time. I'll be having to take more chances.
So how will all these ideas be accomplished? I'm hoping by starting with these things:
- Keep riding my bike at least through December- three times a week
- Strength training because my knees and back hurt me when I play outside. And I'm sick of it.
- Walk my dog three miles everyday. Everyday.
- Eat at least 2-3 servings of vegetables and fruit a day. I've recently discovered how affordable frozen vegetables are, so this just may be achievable.
- Be outside. Just because I really have to be.
Wednesday, August 26, 2009
Things I Really Like About Summer
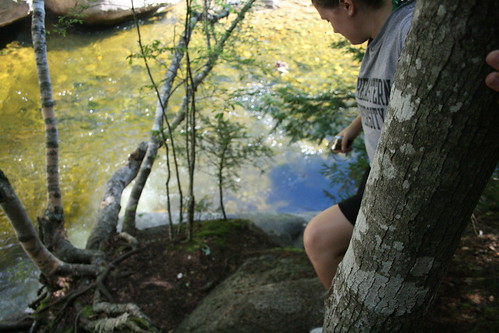

Long walks through the woods
Swimming at perfect swimming holes
Icy cold water
Jumping off rocks into the water
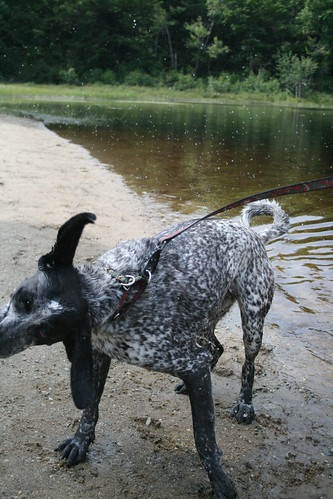
The wet dog shake
Riding my bike for myself
Campfire Pizza Take Two
If you haven’t checked out my previous Campfire Pizza recipe check it out here. The first one is a great version for anyone bicycle touring or backpacking with access to a campfire. The second campfire pizza recipe I have below is more for car camping and has different topping options.
Place out large pieces of tinfoil
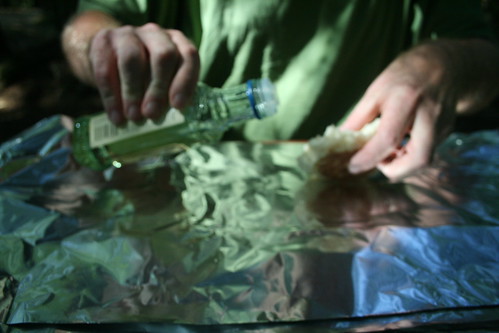
Spread some olive oil out so pizzas don’t stick too bad
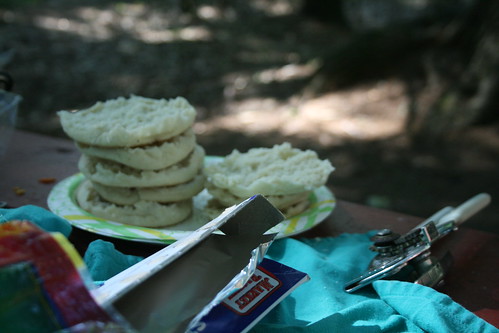
Open up English Muffins (or flatbreads), place on tinfoil
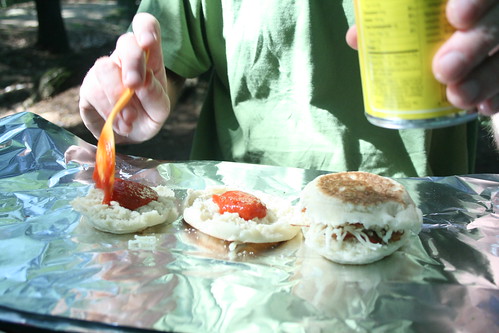
Spread sauce on (also comes as plastic package for less weight)
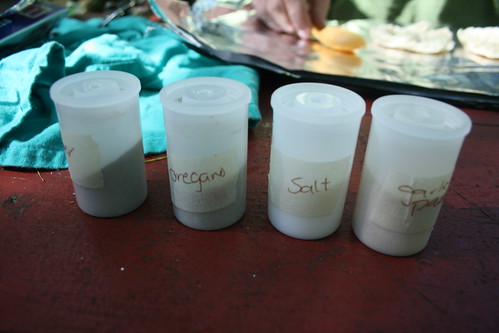
Season up- we choose garlic powder, pepper, oregano
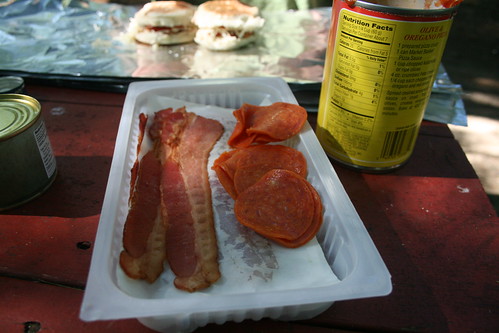
Rip precooked bacon and place on pizzas
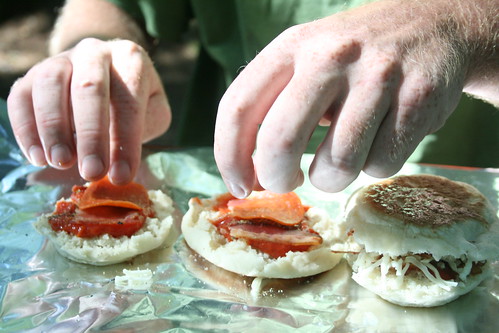
Pepperoni it

Olive it if you like
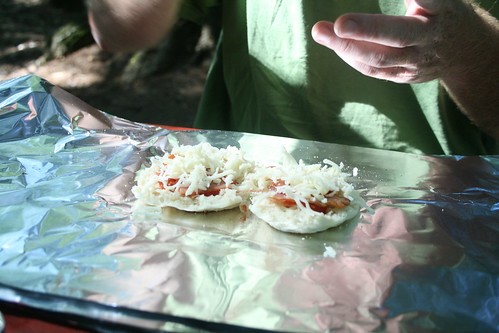
Cheese it. We have some mozzarella here. The first version used Velveeta.
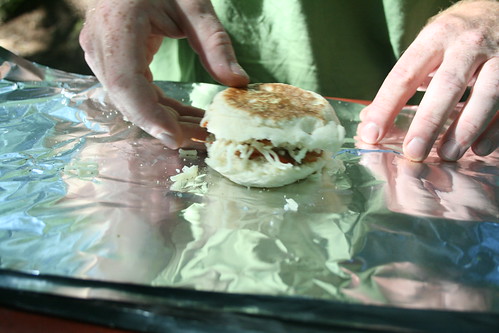
Close together like a sandwich.
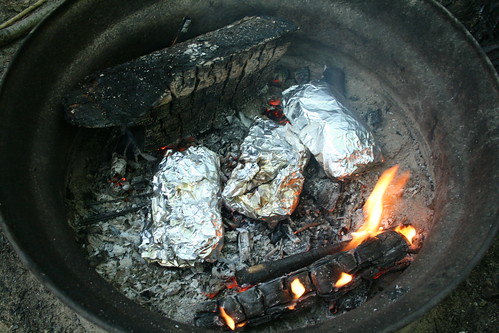
Cook in hot coals for 10 minutes or so, just until cheese melts

Eat as sandwiches or open for regular pizzas. Slightly messy- but very smoky flavored and tasty.

Place out large pieces of tinfoil
Spread some olive oil out so pizzas don’t stick too bad
Open up English Muffins (or flatbreads), place on tinfoil
Spread sauce on (also comes as plastic package for less weight)
Season up- we choose garlic powder, pepper, oregano
Rip precooked bacon and place on pizzas
Pepperoni it
Olive it if you like
Cheese it. We have some mozzarella here. The first version used Velveeta.
Close together like a sandwich.
Cook in hot coals for 10 minutes or so, just until cheese melts
Eat as sandwiches or open for regular pizzas. Slightly messy- but very smoky flavored and tasty.
Monday, August 24, 2009
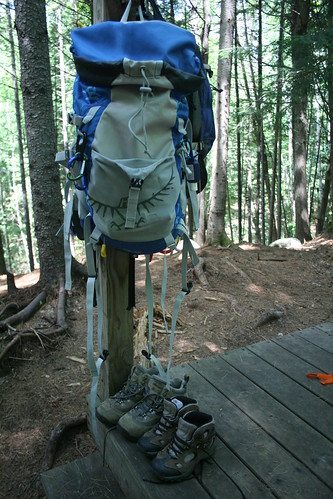
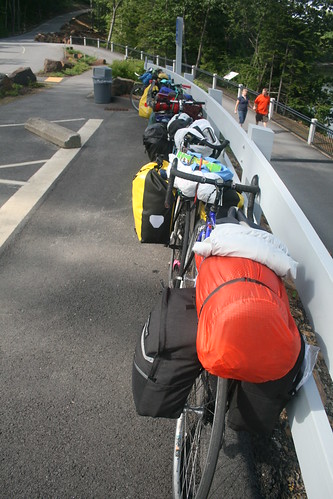
Tips for Staying Organized While Backpacking or Bicycle Touring
I'm a pretty unorganized girl in my day to day, but I really hate being unorganized on big trips. There is nothing like pulling into camp, sitting down to eat your bean/ soup/ something canned dinner to discover you forgot your can opener or that it is in the very bottom of your backpack. How about having to completely empty out a pannier to find your sunblock? Yup, I think we've all been there before.

Recently, I've been finding that I am getting better and better at staying organized on big trips. Here are some ideas that have been working for me lately:
Put Things Back in the Same Place Every time
After years of throwing things around camp trying to find the what's-it-majigger I've found this tip to be the most helpful. When I take out my headlamp from my front pocket, it goes back in my front pocket. Same with all those frequently used goodies.
Keep Similar Items Together
I'm betting that we all sort of know this theory, but it is a great one in action. All the cook stuff sticks together in one spot. Repair kits and first aid things all together. It can be a little tricky keeping all the food together, since this typically weighs the most and you need to spread it carefully in your backpack or panniers, but for everything else I find it helpful to group them together.
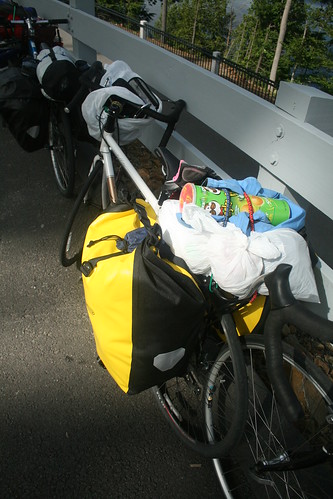
Use Small Lightweight Bags to Keep Organized
I like to have a few small bags organizing my things. For instance my cleaning up stuff (toothpaste, etc). This can be tricky though because each little bag adds more weight and if you have too many bags it actually doesn't help you stay organized at all. So think a few small bags for things. And also, one can never have too many ziplock bags.
Watch Out for Sharp Objects
This can be a real rooky mistake, but be careful where you keep your camp utensils- even your spoon. These items can easily rip through the many plastic bags you have waterproofing your sleeping bag- just setting you up for disaster. I try to keep all sharp things in a small pocket away from anything really important.
Think About Your Day
This is sort of odd but if you think about how your day will go- types of areas you'll be crossing (gaiters?), weather that may roll in, etc. it can help you pack better. I try to always, always, always keep my rain gear right on top. It really is much better than emptying your whole bag while it is down pouring.
I also like to keep a fleece near the top too for unexpected stops or weather. Food, sunblock, camera, are also all things that I like to keep accessible.
What About You?
So what works for you? Any tips that will help the rest of us disheveled folks stay organized?
Recently, I've been finding that I am getting better and better at staying organized on big trips. Here are some ideas that have been working for me lately:
Put Things Back in the Same Place Every time
After years of throwing things around camp trying to find the what's-it-majigger I've found this tip to be the most helpful. When I take out my headlamp from my front pocket, it goes back in my front pocket. Same with all those frequently used goodies.
Keep Similar Items Together
I'm betting that we all sort of know this theory, but it is a great one in action. All the cook stuff sticks together in one spot. Repair kits and first aid things all together. It can be a little tricky keeping all the food together, since this typically weighs the most and you need to spread it carefully in your backpack or panniers, but for everything else I find it helpful to group them together.
Use Small Lightweight Bags to Keep Organized
I like to have a few small bags organizing my things. For instance my cleaning up stuff (toothpaste, etc). This can be tricky though because each little bag adds more weight and if you have too many bags it actually doesn't help you stay organized at all. So think a few small bags for things. And also, one can never have too many ziplock bags.
Pringles on top- always
Watch Out for Sharp Objects
This can be a real rooky mistake, but be careful where you keep your camp utensils- even your spoon. These items can easily rip through the many plastic bags you have waterproofing your sleeping bag- just setting you up for disaster. I try to keep all sharp things in a small pocket away from anything really important.
Think About Your Day
This is sort of odd but if you think about how your day will go- types of areas you'll be crossing (gaiters?), weather that may roll in, etc. it can help you pack better. I try to always, always, always keep my rain gear right on top. It really is much better than emptying your whole bag while it is down pouring.
I also like to keep a fleece near the top too for unexpected stops or weather. Food, sunblock, camera, are also all things that I like to keep accessible.
What About You?
So what works for you? Any tips that will help the rest of us disheveled folks stay organized?
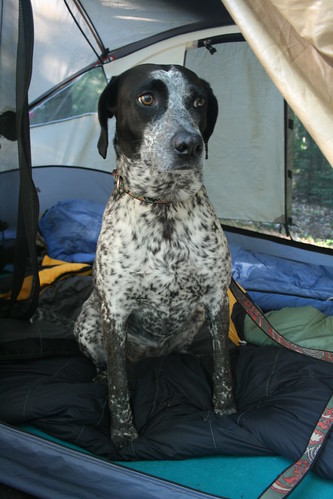
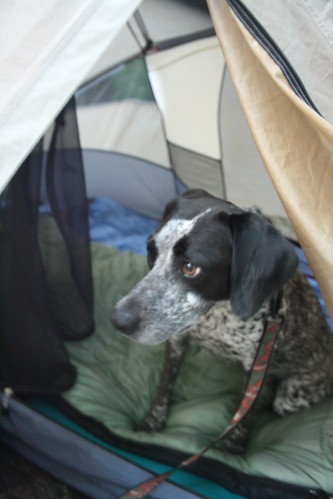
How to Introduce Your Dog to Your Tent for the First Time
I advocate for bringing your dog with you whenever you can. Backpacking poses an interesting challenge for your dog if they aren’t used to sleeping in a tent yet. Here are some ideas to get your dog interested in the idea of sharing some ground space with you: (be careful and use your own judgement here- if your dog is too much of a handful this may require further adjustments and treats)
Get them tired
This should be your first step with them, because you don’t want to introduce them to something new like this when they still have tons of jumping around energy. Go for a nice walk, play catch, read a book together- get them pooped out.
Pitch your tent somewhere familiar
If your tent is freestanding try pitching it in your living room or a familiar grassy area. Move around freely and normally while you are pitching it. Next open up the door or doors if you have them and let Fido go in and out as they please. Another idea is to put a favorite toy, pillow, or blanket in the tent so the dog can smell they smell inside it too. Practice getting in and out together- give them treats and praise. If you can do this more than once that would be helpful.
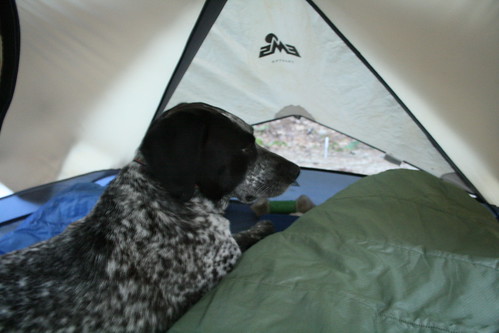
Show them where they should sleep
Dogs sometimes need pointers about what you want them to do. They won’t know right off the bat that you want them to sleep down by your feet (if that is where you choose). Get a blanket or pillow that smells like them and show them that you want them to sleep there. Use encouragement to get them to sit there and relax. Maybe a belly rub even.
We have our dog so used to sleeping in tent she tries to sneak in all the time. Sometimes I need to unzip the tent to throw something in and she's right there trying to get in for bed time.
Get them tired
This should be your first step with them, because you don’t want to introduce them to something new like this when they still have tons of jumping around energy. Go for a nice walk, play catch, read a book together- get them pooped out.
Pitch your tent somewhere familiar
If your tent is freestanding try pitching it in your living room or a familiar grassy area. Move around freely and normally while you are pitching it. Next open up the door or doors if you have them and let Fido go in and out as they please. Another idea is to put a favorite toy, pillow, or blanket in the tent so the dog can smell they smell inside it too. Practice getting in and out together- give them treats and praise. If you can do this more than once that would be helpful.
Show them where they should sleep
Dogs sometimes need pointers about what you want them to do. They won’t know right off the bat that you want them to sleep down by your feet (if that is where you choose). Get a blanket or pillow that smells like them and show them that you want them to sleep there. Use encouragement to get them to sit there and relax. Maybe a belly rub even.
Misty's Spot
We have our dog so used to sleeping in tent she tries to sneak in all the time. Sometimes I need to unzip the tent to throw something in and she's right there trying to get in for bed time.
Friday, August 21, 2009
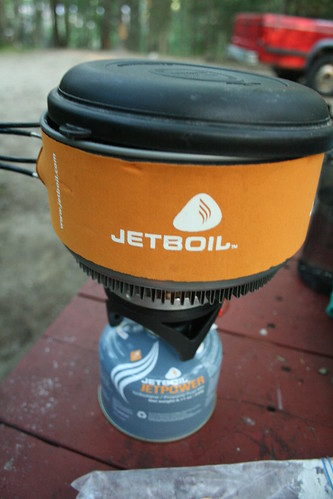
Reasons to Never Bake a Fruit Cobbler on Your Jetboil
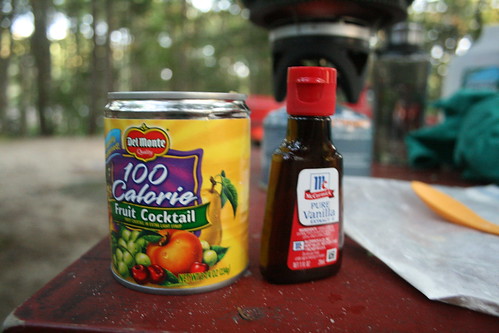
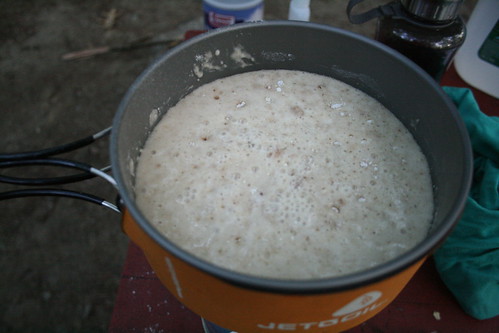
I was thrilled to find this tasty, eggless recipe on the Jetboil’s website. How Martha-Betty-Mountain-Girl-Stewart would it be to turn to my backpacking buddies and say- fruit cobbler anyone? So I prepped everything ahead of time- the whole time thinking- man I’m good at this outdoor cooking thing. Dry stuff in one zippy bag, canned fruit, check, check.
I’m not exactly sure where I went wrong with this recipe. Maybe I shouldn’t have doubled it. Maybe I shouldn’t have been so concerned about it baking all the way through since there wasn’t any eggs in it. Maybe I should have known that baking fruit cobblers on camp stoves isn’t a good idea.
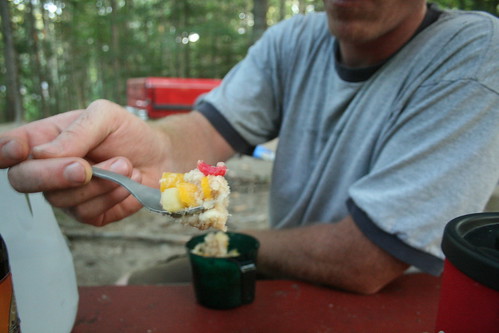
Well, let me tell you gang- it is not a good idea to bake a fruit cobbler on your Jetboil! And whatever you do- don’t double the recipe. At first, it looks good. Heck, it even tastes good. But then you get to the bottom and you realize that you have really, really burned the daylights out of your cook pot.
I’ve been soaking it for six days in water and scrubbing sporadically. I’ve discovered burnt fruit cobbler is a killer to get off and when you let your Jetboil stove get too hot, the special ring on the bottom starts to come up through the pan.
So why am I about to share this recipe with you? Well, I figure it is good to share things that don’t work just as much as it is to share things that do work. Also, I could see this working on a different type of pan and not doubling the recipe. Just remember- you could burn the daylights out of your pan.
Fruit Cobbler Recipe Ingredients (from Jetboils's website):
½ cup sugar
½ cup flour
½ cup milk
1 tsp baking powder
½ tsp vanilla
1/8 tsp cinnamon
2 tbs. butter
1 cup of fruit (sliced peaches, cherries, blueberries, etc., drained of half the juice if from a can or snack cup)
Prepare dry mix of baking powder, sugar, cinnamon, and flour ahead of time. Keep in ziplock bag.
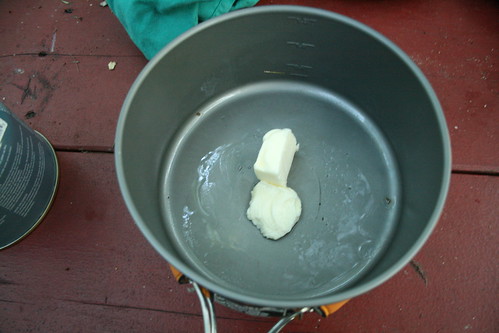
Melt butter in stove on low heat
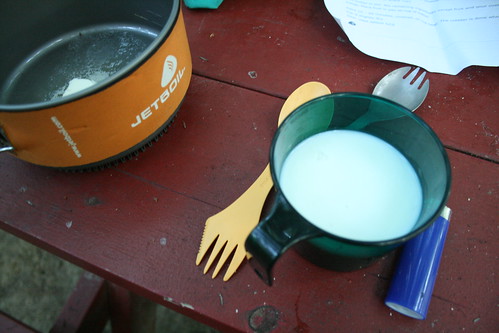
Add milk
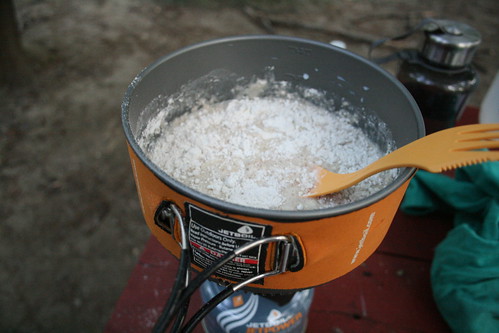
Add dry ingredients, stir
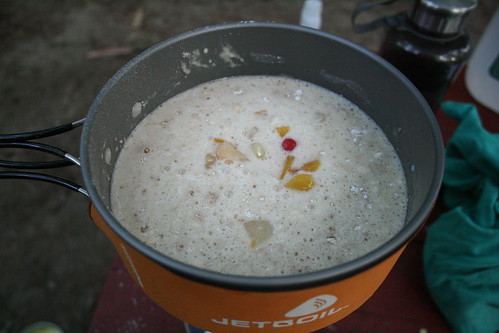
Add fruit mix from can without juice
Cook until top is dry
Letting it get way too hot with the lid on top
Getting even hotter

Probably burning here
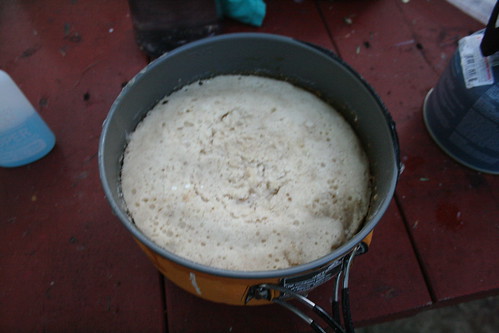
Ta-da! Burnt fruit cobbler
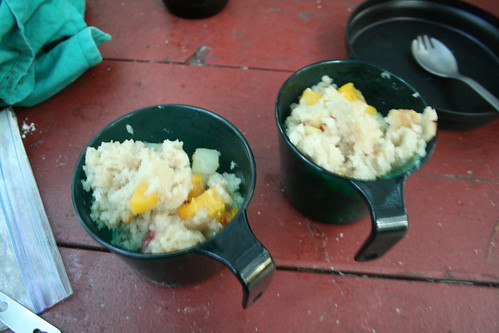
The ironic part is that the cobbler was really damn good.
I’m not exactly sure where I went wrong with this recipe. Maybe I shouldn’t have doubled it. Maybe I shouldn’t have been so concerned about it baking all the way through since there wasn’t any eggs in it. Maybe I should have known that baking fruit cobblers on camp stoves isn’t a good idea.
Well, let me tell you gang- it is not a good idea to bake a fruit cobbler on your Jetboil! And whatever you do- don’t double the recipe. At first, it looks good. Heck, it even tastes good. But then you get to the bottom and you realize that you have really, really burned the daylights out of your cook pot.
I’ve been soaking it for six days in water and scrubbing sporadically. I’ve discovered burnt fruit cobbler is a killer to get off and when you let your Jetboil stove get too hot, the special ring on the bottom starts to come up through the pan.
So why am I about to share this recipe with you? Well, I figure it is good to share things that don’t work just as much as it is to share things that do work. Also, I could see this working on a different type of pan and not doubling the recipe. Just remember- you could burn the daylights out of your pan.
Fruit Cobbler Recipe Ingredients (from Jetboils's website):
½ cup sugar
½ cup flour
½ cup milk
1 tsp baking powder
½ tsp vanilla
1/8 tsp cinnamon
2 tbs. butter
1 cup of fruit (sliced peaches, cherries, blueberries, etc., drained of half the juice if from a can or snack cup)
Prepare dry mix of baking powder, sugar, cinnamon, and flour ahead of time. Keep in ziplock bag.
Melt butter in stove on low heat
Add milk
Add dry ingredients, stir
Add fruit mix from can without juice
Cook until top is dry
Letting it get way too hot with the lid on top
Getting even hotter
Probably burning here
Ta-da! Burnt fruit cobbler
The ironic part is that the cobbler was really damn good.
How to Find the Right Bike Shop
Eventually we all get to the point where we can’t stand the gears skipping, the brakes squeaking, or the wobbling rim a moment more. Unless you’re quick with a wrench, you’ll be knocking on a few bike shop doors. You’ll be quick to discover that just like there are good movies and bad movies, there are also good bike shops and bad bike shops.
Forming a relationship with the right bike shop is crucial to getting a speedy fix during bike season and tips on great local places to ride. Here are some tips to finding the right bike shop:
How busy are they?
How busy a bike shop is good be a good thing or a bad thing. Most of the time I consider it a good thing. It means they have a great location (which may mean it’s easier for me to get to), they have lots of customers and some are bound to be repeat customers. It could be a bad thing, if you need a quick fix or some quick advice and you have to wait a bit. Forming a relationship with a bike shop helps get you in line quicker though, even when they are busy. So when you find a shop you like, try to visit and support them as much as possible.
Are they dismissive about your problem or questions?
I moved recently and had to find a more local shop for repairs and parts, since driving an hour an half wasn’t really working anymore. At the new shop I tried, I asked if they could switch out my handlebar stem for a longer one. I didn’t like how upright I was with this shorter stem. It took close to twenty minutes of “well, a longer stem will make you more stretched out. Most people want to be more upright. Are you sure you want that?”
Umm, yes, I did want to be more upright and I couldn’t have said it more times than I did. If your bike shop won’t take your problems seriously than they can’t possibly help you find the right products.
Do they only talk about how much they’re going to charge you?
At this same bike shop, when I finally convinced them that I did want a longer stem and that I did want to be more extended, he then proceeded to tell me how he’ll have to charge labor me for each one he switched out. Then he told me he didn’t really have any in stock that he could use, but he did have this used one he could sell me for $25.
While, I completely agree that bike shops need to make money and they need to charge for their labor, they shouldn’t make it their main focus. I would have been happy to pay whatever to get the right stem and fit-no problem.
Which person do they look at?
This is a girl’s only rant here, but I’ve visited many bike shops that when I asked them a bike specific question they looked right at my boyfriend and proceeded to give him the answer. It’s one of those hard to switch-between-two-people-standing there talking things, but still when a girl asks a question- look her right in the eye and tell her the answer.
So what do you guys think about finding the right bike shop? Any advice you can offer? Have you ever run into similar problems? Do share!
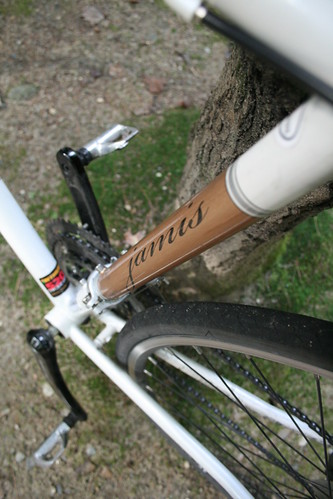
Jamis Women’s Satellite Road Bike (Satellite Femme) Product Review - Initial Thoughts
This year I finally took the big jump into road biking having been primarily a mountain biker for over ten years. I ended up choosing as the Jamis Women’s Satellite Road Bike, or more officially, the Satellite Femme. I was looking for a road bike that would be quick and fast for group rides, but also as comfortable as possible for touring since I had a big bicycle tour planned for this summer.
I’ll be sharing what drew me to the Jamis Women’s Satellite Bike, how it works for road rides, touring, and more. Subscribe to my feed so you don’t miss a beat.
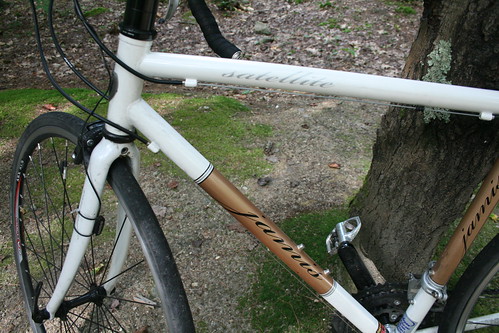
Why I choose the Jamis Women’s Satellite Bike
When choosing a road bike at the beginning of this summer, I was looking for two things- speed and comfort. Coming from mountain biking almost any road bike would be lighter and faster. I wasn’t going to be fooled though by a little lighter- I wanted as light as I could afford. I’ve spent enough years riding mountain bikes that were too heavy or just didn’t fit right and I wasn’t willing to compromise on the road either.
I went with a Jamis bike because I’ve owned two mountain bikes from them before (Durango and Dakota Sport). They offer decent components at a pretty fair price. The Jamis Satellite had several components that I was looking for: carbon fork (I wanted this for touring), Reynolds 520 double-butted chromoly frame (also for comfort), and solid wheels. All coming in at around 21 lbs. Right off the bat the only thing I wasn’t super excited about was the color- white? Really?
So how does it ride on quick group jaunts? What about bicycle touring? More details to come.
Jamis Women’s Satellite Bike Specs from Jamis
Frame: Reynolds 520 double-butted chromoly main tubes featuring SST tubing diameters, sloping top tube frame design, double-tapered cromo stays, forged dropouts with single eyelets
Fork: Full carbon composite road fork with forged alloy dropouts
Headset: Ritchey LB Aheadset, 1 1/8”
Wheels: Alex AKX R1.0 wheelset, 28H radial front/ 32H 3X rear, sealed alloy hubs 14g stainless steel spokes
Derailleurs: Shimano Tiagra GS rear & Sora front, 28.6mm clamp
Shiftlevers: Shimano Sora Dual Control STI, 27-speed
Cassette: SRAM PG-950, 9-speed, 12-26
Crankset: FSA Vero Triple, 52/42/30, 165mm (48), 170mm (51/54)
BB Set: Sealed Cartridge, 68 x 116mm
Brakeset: Tektro dual pivot calipers with Shimano Sora STI levers
Stem: Ritchey Road Forged, 31.8mm x 6˚, 90mm (48/51), 100mm (54)
Disclaimer: Product Reviews are based on opinion only and are not intended to condone, encourage, or promote a product. Some products are sent to me by the manufacturer or affiliates and are mine to keep. I mention this specifically on products sent to me. Compensation and/or product and/or services never interfere with the review of the product. Otherwise, products and services are purchased by me for personal use. Bike was purchased by me.
I’ll be sharing what drew me to the Jamis Women’s Satellite Bike, how it works for road rides, touring, and more. Subscribe to my feed so you don’t miss a beat.
Why I choose the Jamis Women’s Satellite Bike
When choosing a road bike at the beginning of this summer, I was looking for two things- speed and comfort. Coming from mountain biking almost any road bike would be lighter and faster. I wasn’t going to be fooled though by a little lighter- I wanted as light as I could afford. I’ve spent enough years riding mountain bikes that were too heavy or just didn’t fit right and I wasn’t willing to compromise on the road either.
I went with a Jamis bike because I’ve owned two mountain bikes from them before (Durango and Dakota Sport). They offer decent components at a pretty fair price. The Jamis Satellite had several components that I was looking for: carbon fork (I wanted this for touring), Reynolds 520 double-butted chromoly frame (also for comfort), and solid wheels. All coming in at around 21 lbs. Right off the bat the only thing I wasn’t super excited about was the color- white? Really?
So how does it ride on quick group jaunts? What about bicycle touring? More details to come.
Jamis Women’s Satellite Bike Specs from Jamis
Frame: Reynolds 520 double-butted chromoly main tubes featuring SST tubing diameters, sloping top tube frame design, double-tapered cromo stays, forged dropouts with single eyelets
Fork: Full carbon composite road fork with forged alloy dropouts
Headset: Ritchey LB Aheadset, 1 1/8”
Wheels: Alex AKX R1.0 wheelset, 28H radial front/ 32H 3X rear, sealed alloy hubs 14g stainless steel spokes
Derailleurs: Shimano Tiagra GS rear & Sora front, 28.6mm clamp
Shiftlevers: Shimano Sora Dual Control STI, 27-speed
Cassette: SRAM PG-950, 9-speed, 12-26
Crankset: FSA Vero Triple, 52/42/30, 165mm (48), 170mm (51/54)
BB Set: Sealed Cartridge, 68 x 116mm
Brakeset: Tektro dual pivot calipers with Shimano Sora STI levers
Stem: Ritchey Road Forged, 31.8mm x 6˚, 90mm (48/51), 100mm (54)
Disclaimer: Product Reviews are based on opinion only and are not intended to condone, encourage, or promote a product. Some products are sent to me by the manufacturer or affiliates and are mine to keep. I mention this specifically on products sent to me. Compensation and/or product and/or services never interfere with the review of the product. Otherwise, products and services are purchased by me for personal use. Bike was purchased by me.
Wednesday, August 19, 2009
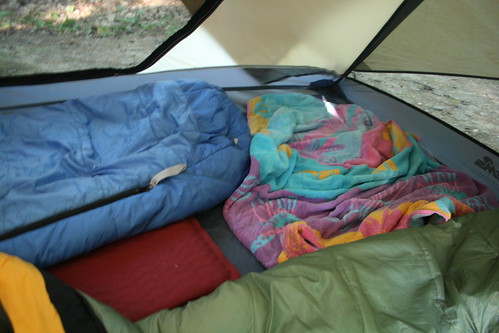
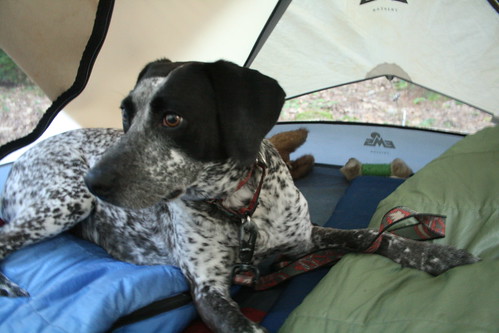
Tips for Letting Your Dog Sleep in the Tent
In my past posts about backpacking with dogs I gave pointers on what to bring, etiquette, and sleeping arrangements. Letting your dog sleep in the tent with you while camping is a great way to insure that they sleep safely. At the same time, letting your dog sleep in your tent takes a little preparation.
I have some more tips on how to get your dog to sleep in the tent with you here. Keep in mind, you should really use your own judgement about your dog and their ability to sleep in the tent with you. I used to have a wild Dalmatian and it would have been next to impossible to get her to sleep in the tent with us. That in mind here are some other ideas and tips:
Watch the nails
Prevention is key here. Keep your dogs nails short and trim and you will have less incidents with them ripping open your tent or sleeping bag. This tends to be the thing that concerns me the most, since even the best, most well behaved dogs can rip a sleeping bag open.
Bring patches for things
Keeping your dogs nails short helps prevent a ripped sleeping bag, but sometimes it’s just going to happen. I always have things on hand that I can use to patch my tent or sleeping bag. Duct tape also provides a solution for the times that you are really in a pickle. Small clippers on hand can take care of ripped nails too.
Get them good and tired (have them carry a backpack)
The best way to introduce your dog to tent sleeping is to get them really good and tired first. Backpacking or hiking all day, playing with dog toys, whatever you have to do to make Fido good and tired will aid in everyone’s rest in the evening.
Bring a blanket for them (and toys)
Have a small blanket or towel on hand (sneak it into their pack when they’re not looking!) for the dog to sleep on at the end of the tent. I know, that is pampering a dog a bit, but in the beginning it helps. Be prepared though, they eventually weasel their way up onto you, your sleeping pad, or bag by morning.
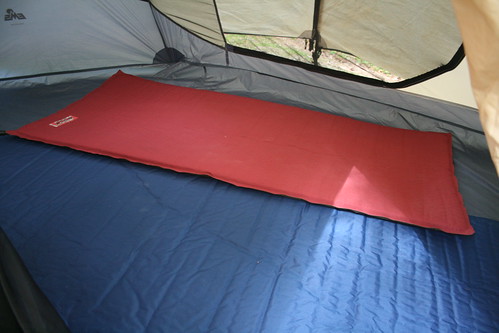
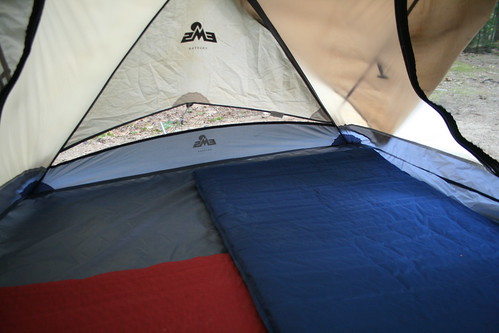
EMS Base Camp Pad Product Review- Initial Thoughts
Last backpacking trip, Adam broke the news to me that if he didn’t get a better sleeping pad, he wouldn’t be joining me camping anymore. I have to hand it to the guy, he has the worst back ever and he hasn’t really complained about the dinky cheap foam pad he’s been sleeping on. So I researched and I hunted and I debated, mainly with my mom at the camping store while Adam was at work.
We ended up selecting the EMS Base Camp Pad because it had the most cushion for the buck. Others, offered more cushion at steep prices. The EMS Base Camp Pad was reasonably priced ($99 and on sale at the time) and offered 2 inches of cushion.
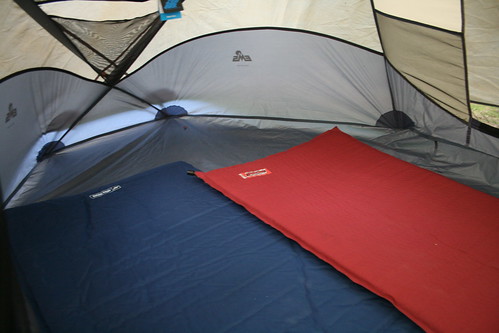
Initial Thoughts On EMS Base Camp Sleeping Pad
The specs looked nice- two inches of cushion, self inflating, a larger width for comfortable sleeping. It wasn’t pink. It looked like the EMS Base Camp Pad was perfect for Adam. I let the pad inflate at home and that is when I realized its first con- the thing is super long. The length on the website is 77 inches. Might as well be seven feet. I wasn’t entirely sure it would fit in the tent.
The other thing is the EMS Base Camp Pad is heavy for a sleeping pad. It comes in at close to four lbs. We certainly wouldn’t be doing lightweight backpacking with the sleeping pad. I couldn’t get everything to be in one perfect package though- lightweight, lots of cushion, and under $100.
So how would the EMS Base Camp Pad hold up to Adam’s first night critique? Would it be ridiculous for backpacking? We’ll check in with Adam to see what he thinks and a final review to come.
Specs on the EMS Base Camp Sleeping Pad from EMS
Weight 3 lb. 12 oz.
Length 77 in.
Width 25 in.
Thickness 2 in.
Packed Size 25 x 8 in.
Stuff Sack Yes
Sleeping Pad Type Self Inflating
We ended up selecting the EMS Base Camp Pad because it had the most cushion for the buck. Others, offered more cushion at steep prices. The EMS Base Camp Pad was reasonably priced ($99 and on sale at the time) and offered 2 inches of cushion.
Initial Thoughts On EMS Base Camp Sleeping Pad
The specs looked nice- two inches of cushion, self inflating, a larger width for comfortable sleeping. It wasn’t pink. It looked like the EMS Base Camp Pad was perfect for Adam. I let the pad inflate at home and that is when I realized its first con- the thing is super long. The length on the website is 77 inches. Might as well be seven feet. I wasn’t entirely sure it would fit in the tent.
The other thing is the EMS Base Camp Pad is heavy for a sleeping pad. It comes in at close to four lbs. We certainly wouldn’t be doing lightweight backpacking with the sleeping pad. I couldn’t get everything to be in one perfect package though- lightweight, lots of cushion, and under $100.
So how would the EMS Base Camp Pad hold up to Adam’s first night critique? Would it be ridiculous for backpacking? We’ll check in with Adam to see what he thinks and a final review to come.
Specs on the EMS Base Camp Sleeping Pad from EMS
Weight 3 lb. 12 oz.
Length 77 in.
Width 25 in.
Thickness 2 in.
Packed Size 25 x 8 in.
Stuff Sack Yes
Sleeping Pad Type Self Inflating
Tuesday, August 18, 2009
Orange Campfire Cakes
I first read about these campfire cakes here on this blog. The idea of baking a cake while on a camping trip seemed ultra messy, but also tasty and intriguing. Who doesn’t want to say while camping- care for some campfire cake?
The recipe seemed perfect for car camping, so I whipped up the batter before we left and ziplock bagged it.
Here is how it goes:
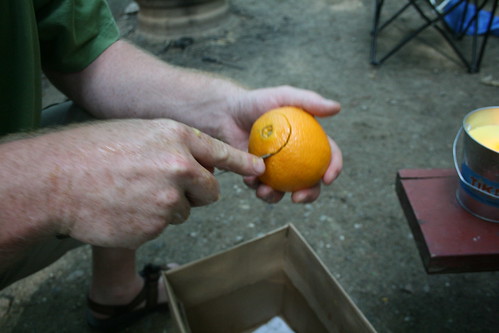
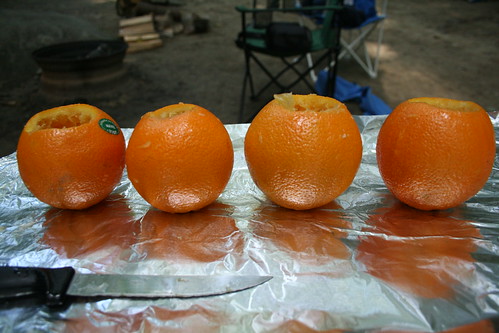
You open up one side of a thick skinned orange and scoop out the pulp
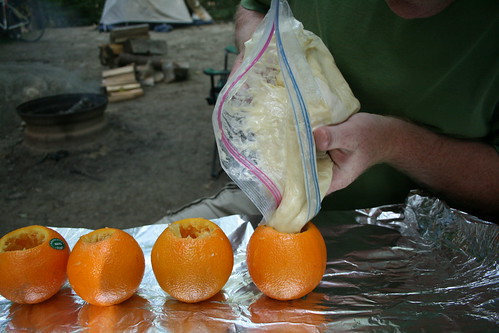

You pour in some instant cake batter mixture. Ya, know it comes from a box.
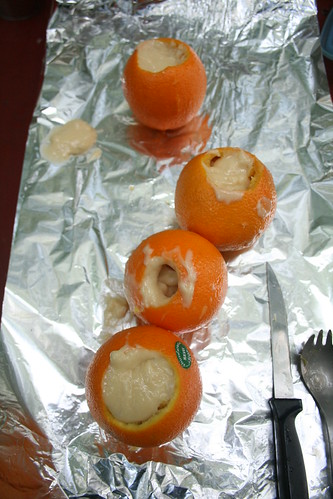
You pour in the cake batter close to the top of the orange
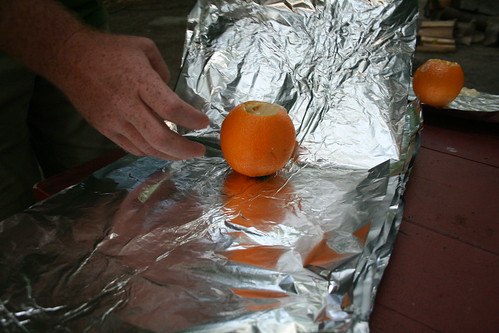
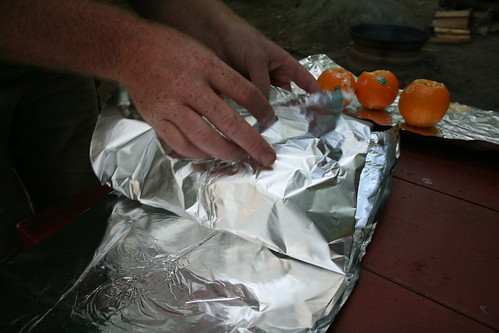
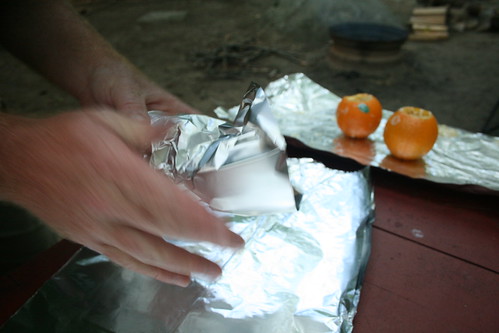
You wrap securely in tinfoil and place on hot campfire coals.
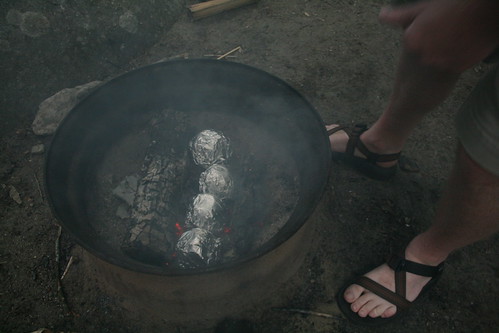
We ended up cooking it for a full 30-40 minutes because our coals weren’t so hot anymore.
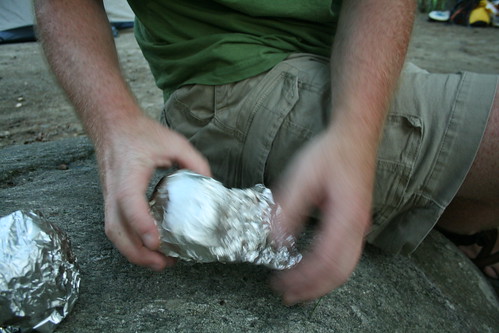
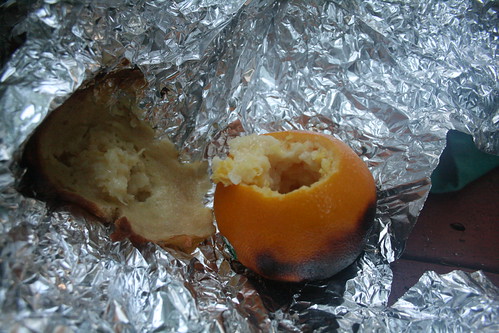
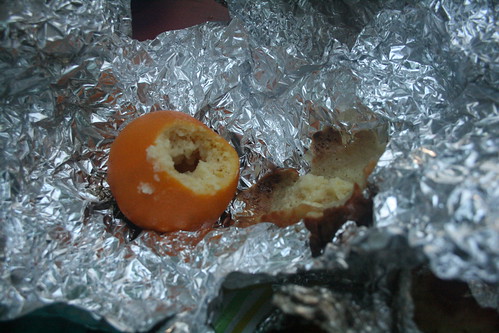
Then you enjoy.
Here is what I think:
This is borderline highly messy for camping. Even with the prepared cake batter in a ziplock bag trick. The timing for the cakes is somewhat imperfect too. The blog I originally found the cakes on had bake time at 5-10 minutes whereas ours was easily 30 plus minutes. Most of the cake batter ended up on the outside of the orange. So be prepared to experiment with cook times.
But….the cakes were amazingly delicious and I would definitely try it again and work on perfecting the coals and temperature more.
The recipe seemed perfect for car camping, so I whipped up the batter before we left and ziplock bagged it.
Here is how it goes:
You open up one side of a thick skinned orange and scoop out the pulp
You pour in some instant cake batter mixture. Ya, know it comes from a box.
You pour in the cake batter close to the top of the orange
You wrap securely in tinfoil and place on hot campfire coals.
We ended up cooking it for a full 30-40 minutes because our coals weren’t so hot anymore.
Then you enjoy.
Here is what I think:
This is borderline highly messy for camping. Even with the prepared cake batter in a ziplock bag trick. The timing for the cakes is somewhat imperfect too. The blog I originally found the cakes on had bake time at 5-10 minutes whereas ours was easily 30 plus minutes. Most of the cake batter ended up on the outside of the orange. So be prepared to experiment with cook times.
But….the cakes were amazingly delicious and I would definitely try it again and work on perfecting the coals and temperature more.
Subscribe to:
Posts (Atom)